Date: September 13 - October 26, 2025
The time period for this post overlaps with my previous post on trade rough-ins. That is a description of what other people were doing on the project, while this post shows how I was spending my time. You may recall that way back in my Roofing post I included a picture of the tractor being worked on in the garage taken only about a week before the start of this timeline. I was fixing a bad hydraulic fluid leak so that I could get started moving dirt and gravel around. Our house construction 18 years ago gave me some anti-patterns (to use a software industry buzzword): don't put off building the stairs, and don't put off doing the backfill. Getting both of those done ASAP makes the construction activities a lot easier.
So once the roof was on my next priority was getting the siding done. Which would benefit from not having a gaping hole around three sides of the building. After hand-digging a french drain behind our Vashon house to keep the basement from flooding, I'm very particular about how I fill in behind my buildings. I want pure gravel to be next to the building so any water that moves through the soil will never reach the wall but will drop down to the footer drains. Some folks might just buy gravel to fill in the entire hole. In fact, there is an enhanced dump truck for that called a Gravel Slinger that looks like this:
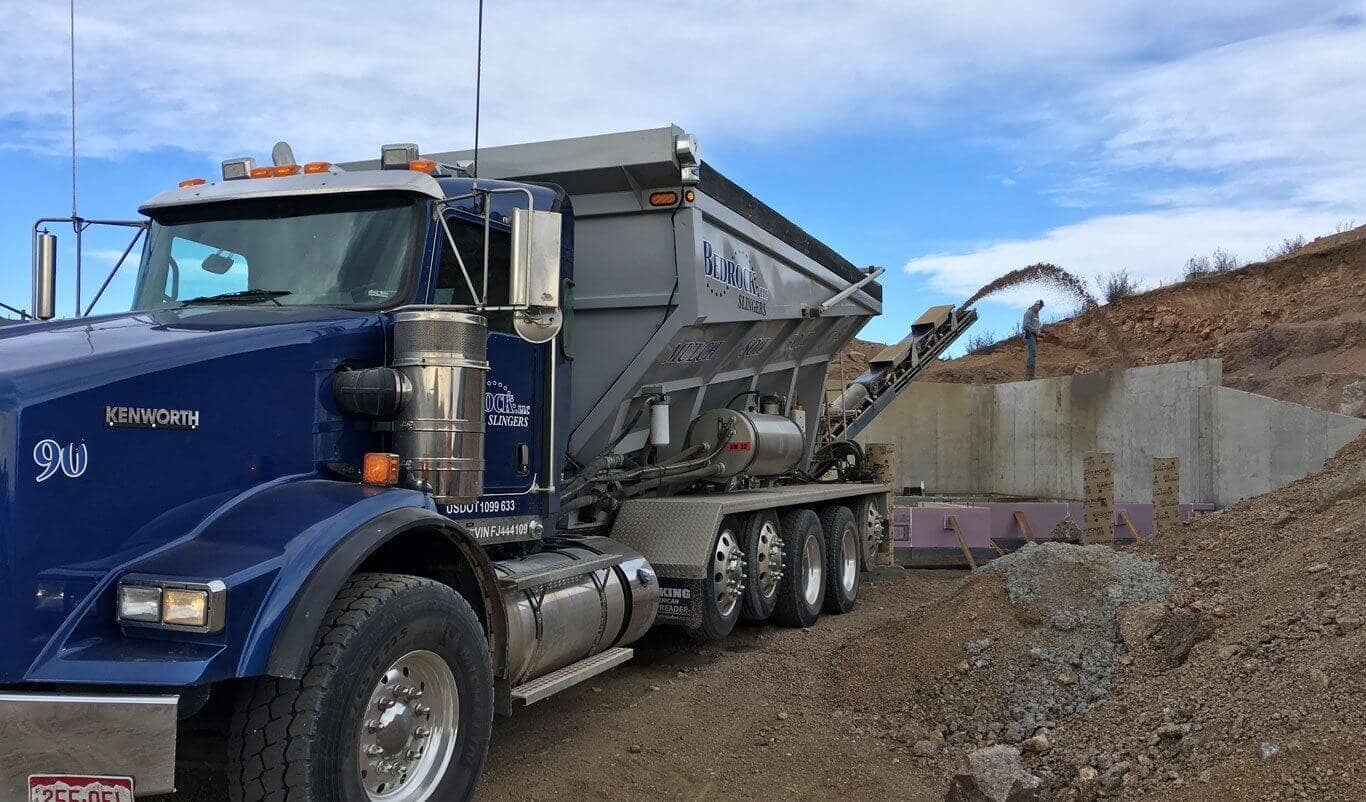
When the truck driver brought the gravel for the slab preparation he mentioned that his company had one, but said I could forget about requesting it because it was a monster and wouldn't be able to get up our driveway. With or without the slinger, every truckload of gravel is $600, so filling in that monster hole completely with gravel is just more than I'm willing to spend. Besides I had something dirt-cheap on hand!
At the start of the process I have piles of dirt below the
parking area, ...
two truckloads of gravel in the parking area, and ...
space around the back three sides of
the building. My first step was getting the pipes placed that needed to get buried behind the building. The grey vertical pipe is a clean-out to the drain that goes under the slab. The black pipe goes from the spring pump, into the side of the wet root
cellar, then out the back wall of the cellar, around the corner...
and down the side of the to the spot
where the original pipe was sticking into the excavation. I used some
tape and shrink wrap to try to keep it held up on the side of the building. The purple pipe is for the roof gutter drain. It might seem excessive to have a drain for the gutter when down below I have a drain for the footer and slab, but one never wants to route rain water down to the footer since if that drain got blocked you'd be exacerbating the problems at the slab level.
Notice the sheets of plywood standing about 8" from the building wall ... more on that later.

The black pipe with dirt on it is the cold water supply line going into the building. It isn't connected to the house water system yet.
Views of the same hole from the other (garage door) side of the building.
I dumped/shoveled gravel between the plywood and the building, and dumped dirt and rocks on the other side of the board to keep it vertical. You'll notice I gave up on having the gutter drain pipe in place - it was getting in the way. Since it doesn't need to be deep, I'll just dig a trench for it later.
When the level of fill gets more than half way up, I raise the board:
In the picture above, where the gangplank is going into the building, you can see there isn't much room between the rock on the left and the hole on the right. Too tight for the tractor to be safe. So I needed to fill up the gap so I could work around the back of the building. However the conduit access I'd run through the ICF wall for the solar wiring was getting buried, but I'd need to uncover that later. Solution: fill that section with tree rounds which will hopefully make the uncovering process easier:
Add some more gravel...
You'll notice the tractor access road is getting more developed as I go. Starting to chip away at the dirt on the hill behind so I can drive back further. I've extracted the plywood and moved it back the ditch toward the corner.
Shoveling gravel was exhausting so I used some old roofing to make a chute of sorts to allow me to dump gravel into the slot directly out of the tractor bucket.
This is how that plywood gets raised when it starts to get buried:
Putting a dent in my source pile:
I came across some old blue foam boards I'd been holding on to. Perfect to use to thicken up the protection on the root cellar roof. They'd completely
slipped my mind, which argues strongly for donating materials to Habitat that are
left over from a job.
Plywood located farther back:
Getting close to the height of the root cellar roof:

Without plywood stopping the gravel from pouring out the end, the gravel just kept on flowing around the corner and filling the back side. I decided I'd better start placing the 6 inch corrugated pipe. It's drain pipe, but it's not a drain. You may remember me mentioning Arvil Coates in a previous post who deals with used building materials. When I was talking to him about my excavation he said that if you've got a big backfill it's a good idea to bury a 6" pipe in there so you can "get cold air all summer" from it. "Even if it's not enough to completely cool your space, the mini-split will have a lot easier job," he explained. It sounded like a good idea to me. You might ask if running warm air through that pipe in the summer time won't heat up the soil around those root cellars? I'm not too worried about the effect on the cellars because (a) the cellar walls have 2 inches of styro insulation on both sides the temperature inside will reflect the uninsulated floor and ceiling, (b) the trench behind the cellar is pretty wide, and (c) there is water flowing out of that hillside constantly, which I'm guessing will keep cooling the soil around the pipes even if they are quite warm.

Once I had the root cellar side filled higher I could raise the door threshold level to make it easier to get in and out:
The finished look I'm after for backfill phase 1.
Plywood migrated around the corner so I could stop filling the whole width with gravel:
The supply is looking depleted after about a week of shuttling dirt:
Start the covering of the root cellar. There will be a layer of gravel on it to make sure the water has an easy way to drain off the root cellar roof. The backfill is now making the space on the right safe to drive the tractor up the hill.
A lot more hole to fill:

Capturing geothermal cooling is a good idea, but it sure don't make the backfill process simpler!
Tying the pipes up so they don't squash together at the bottom of the hole.
Fifty feet up the hill behind the building I had another stash of excavation dirt which I could now access.
Sunlight illuminates the far side of the hole after two weeks plugging away at it:
I decided to hook up the supply water to the house system before continuing on with the backfill:
Funny story about uncovering that water line. When I uncovered it I saw it was inch-and-a-half pipe, and I didn't have the right size fittings, so I had to stop work until I could make a trip into Lowes to get the parts to make a Tee. A couple days later when I had them, I cut the pipe and, low and behold, in 2013 I'd used the 1.5" pipe as a sleeve to run the actual water pipe inside, which was 1" pipe. And of course those parts I'd had all along. Forgot all about that quality job!
Documenting location of buried pipe:
Added some purple pipe to the slab drain clean-out:
Bringing dirt down the hill from the pile above was easier.
Looking down at third wall of the root cellar after I've relocated the plywood around that corner:
The final arm of the job is the east side of the building (looking south):
At same corner looking west:
With the gravel on the cellar roof it seemed protected enough to drive on it:
Pulling the plywood up on the corner is tricky because if I lift one side too much it tears into the waterproofing membrane on the adjacent wall.
It's now been about a month since I started moving dirt:
I decided to use the pile of mostly rocks from below the parking area to add height around the entrance door. I want that area really solid.
Progress after another week. The hole around the root cellars now completely filed. It was a neat passageway while it lasted.
I decided to run a drain pipe across the top corner of the root cellar roof since there will be another gravel channel next to the building above it.
The two black pipes in the lower left of the picture below are the water
line from the spring pump and a second line for spring overflow which
I'm planning to use to provide the wet root cellar with a continuously
running flow.
Geothermal pipe selfies (maybe the last I'll see of that bedrock):
Like I said, it's a deep hole:
About this time I ordered another two truckloads of gravel and proceeded with working my way up:
Getting to the last corner. Creating a road of sorts on the left side to get tractor access, which handily provides dirt for fill:
For this corner I put restraining scrap plywood to keep the gravel from just pouring out the end. Those scraps I'll leave in place (buried).
Six weeks into the fill activity:
My quality was starting to slip: the gravel wasn't staying in bounds and the big rocks rolling down the fill slope kept pushing the plywood closer to the building. I'm down to about 2" of space next to the building on the corner so I had to create a second wall with scrap pieces to make the gravel channel wider:
Finally made it around the corner and into the home stretch
Then I spent a full day convincing a walnut tree stump that it wasn't going to say put.
Triumphant!
Back when Austin's crew was doing the sheathing there was a bunch of scrap pieces which I had used to stabilize an erosion spot in the lower field. However I realized it's higher use was to bury it as the gravel separator so that I wouldn't have to move the big sheets of plywood as much. So I made several trips ferrying the scraps back to the building site:
Geothermal pipes making the turn up to the surface before the end of the wall:
Phase 1 declared done enough for the siding work to commence, which pretty much coincided with when the siding crew said they could start work.


No comments:
Post a Comment